TOOL1SHOoo F Type Resistor Forming Machine Manual Axial Lead Bend Cut & Form Machine
Key item features
- High Efficiency: This resistor forming machine can complete both forming and foot cutting at the same time, with high processing capacity, saving your time.
- Exquisite Workmanship: The cutting gear, forming gear, round cutter, and forming sheet are quenched and forged, hardened for high hardness, good toughness, impact resistance, anti-abrasion, and not easy to be broken, ensuring good processing performance.
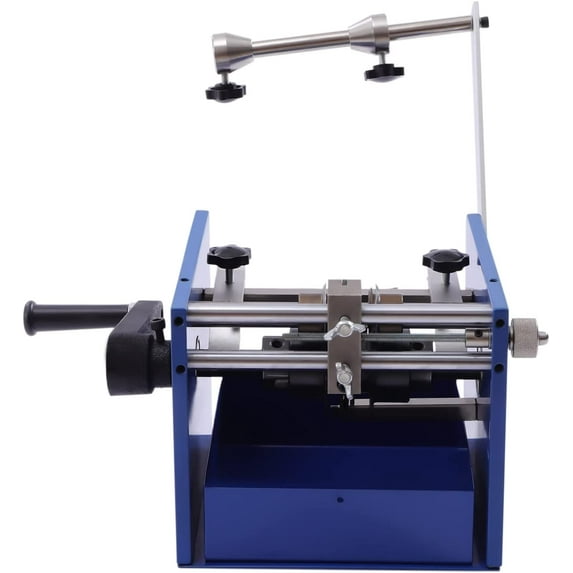
- How to Operate1. Unscrew the plum twist on the feed clamp and move the feed clamp to both sides of the machine.2. Loosen the set screw on the forming gear with the Allen key and let the two forming gears move closer to the forming piece. Please note that the clearance between the forming plate and the forming gear is slightly larger than the wire diameter of the component.3. Place the rewinder and the forming sheet in the middle of the two forming gears. The clearance between the two sides of the forming piece is slightly larger than the wire diameter of the component to avoid damaging the component when forming. (If the forming sheet is not centered in the middle of the forming gear, please adjust the knob on the side of the fixing bar to make the forming sheet centered)4. Loosen the fixing screws on the cutting gear with the Allen key respectively.5. Adjust the distance between the cutting gear and the forming gear to the desired size. Tighten the set screws on the cutting gear.6. Adjust the span. There is an Allen screw on the aluminum base to adjust the span. Turning the Allen screw clockwise will result in a smaller span while turning it counterclockwise will result in a larger span.7. Place the braiding component on the hanging pole.8. Adjust both feed clips so that the width is the same as the width of the braiding component and allow the braiding component to pass through the feed slot. Tighten the plum screw on the feed clip.The component is placed between the forming tooth and the cutting tooth.9. After the above process is completed. Turn the lever at a constant speed, making the components follow the forming gears one by one and feed them into the cutting gears and circular cutter for processing, and then the forming gears and the forming sheet finish the forming process.10. The processed parts are dropped into the container through the rewinder until all the components are processed.
- About Brand: TOOL1SHOoo COLLECTION is a professional tool and equipment company aiming to provide quality products and services. If you have any problems, please feel free to contact us and we will reply to your in 24 hours.
- 100% Quality Assurance: We ship directly from the US warehouse. Feel free to contact us if you have any questions. We will provide the best suitable solutions for you. We are committed to provide best service for every customer!
- Notes1. When using this machine, please check whether all fastening screws are tightened.2. Cutting gear, forming gear, circular cutting knife, and forming sheet are heat-treated parts, which should avoid collision with each other to produce fracture.3. The bending gap should be adjusted according to the wire diameter of the component leads, and the standard is not to expose the copper. A slight flattening of the component lead is normal.4. After each process, please remove the waste in time.5. When not working for a long time, the parts should be protected with a little oil and wiped off before use.6. Please do not bite the body of the component into the gear, which may break the gear.7. Please add a little 40# motor oil every 3-5 days. Shaping axle, and cutting axle should always keep lubrication. Please add a little 40# motor oil every 3-5 days.8. The distance between each part on both sides should be symmetrical when placed, otherwise, it will affect the exit material.9. Before installation and use, please check the packing list and read the manual carefully.10. Please allow the slight color difference caused by the shooting light and 1-3 cm error due to manual measurement, and make sure you do not mind before ordering.
Specs
- BrandTOOL1SHOoo
- FeaturesAdjustable
How do you want your item?
About this item
Product details
[Application]
It is suitable for forming and cutting different electronic components such as taping resistors and diodes.
[Key Features]
Robust and Durable——High-quality iron housing with a painted surface, sturdy, durable, rust-proof, and corrosion-proof. Durable steel with a sharp blade, high strength, high toughness, and good cutting ability.
Adjustable Enough——The forming span can be adjusted by loosening the set screw on the cutting gear. You can also loosen the butterfly screw on the forming plate and move the forming plate inside and outside to get different forming angles of the processing
components
Economical and Safe——Hand-cranked without the need for a power connection, which is economical
Compact and Lightweight——It is compact (7.87*7.87*6.88in) and lightweight (22lbs for easy carry
Components Collection Box——It is equipped with a collection box to store molding components and the extracted tape ends, making it convenient to operate and easy to organize.
[Specification]
Housing Material: Iron
Cutter Material: Steel
Fixing Bar Material: Solid Steel
Hand Shank Material: Solid Cast Iron
Surface Treatment: Painted
Craftsmanship: Quenched and Forged, Hardened
Color: Blue, Black, SilverProcessing Type: F Type
Packing Size: 34*31*40cm/13.38*12.2*15.74in
Product Size: 20*20*17.5cm/7.87*7.87*6.88in
Hanging Pole Length: 19cm/7.48in
Hand Shank Length: 16cm/6.29in
Handle Length: 10cm/3.93in
Gross Weight: 12kg/26.45lbs
Net Weight: 10kg/22lbs
[Package Included]
1 x Resistor Forming Machine
1 x Hanging Pole
1 x Support Bar
1 x Hand Shank
1 x Components Collector
1 Set x Allen Keys
1x Chinese Manual
- High Efficiency: This resistor forming machine can complete both forming and foot cutting at the same time, with high processing capacity, saving your time.
- Exquisite Workmanship: The cutting gear, forming gear, round cutter, and forming sheet are quenched and forged, hardened for high hardness, good toughness, impact resistance, anti-abrasion, and not easy to be broken, ensuring good processing performance.
- How to Operate1. Unscrew the plum twist on the feed clamp and move the feed clamp to both sides of the machine.2. Loosen the set screw on the forming gear with the Allen key and let the two forming gears move closer to the forming piece. Please note that the clearance between the forming plate and the forming gear is slightly larger than the wire diameter of the component.3. Place the rewinder and the forming sheet in the middle of the two forming gears. The clearance between the two sides of the forming piece is slightly larger than the wire diameter of the component to avoid damaging the component when forming. (If the forming sheet is not centered in the middle of the forming gear, please adjust the knob on the side of the fixing bar to make the forming sheet centered)4. Loosen the fixing screws on the cutting gear with the Allen key respectively.5. Adjust the distance between the cutting gear and the forming gear to the desired size. Tighten the set screws on the cutting gear.6. Adjust the span. There is an Allen screw on the aluminum base to adjust the span. Turning the Allen screw clockwise will result in a smaller span while turning it counterclockwise will result in a larger span.7. Place the braiding component on the hanging pole.8. Adjust both feed clips so that the width is the same as the width of the braiding component and allow the braiding component to pass through the feed slot. Tighten the plum screw on the feed clip.The component is placed between the forming tooth and the cutting tooth.9. After the above process is completed. Turn the lever at a constant speed, making the components follow the forming gears one by one and feed them into the cutting gears and circular cutter for processing, and then the forming gears and the forming sheet finish the forming process.10. The processed parts are dropped into the container through the rewinder until all the components are processed.
- About Brand: TOOL1SHOoo COLLECTION is a professional tool and equipment company aiming to provide quality products and services. If you have any problems, please feel free to contact us and we will reply to your in 24 hours.
- 100% Quality Assurance: We ship directly from the US warehouse. Feel free to contact us if you have any questions. We will provide the best suitable solutions for you. We are committed to provide best service for every customer!
- Notes1. When using this machine, please check whether all fastening screws are tightened.2. Cutting gear, forming gear, circular cutting knife, and forming sheet are heat-treated parts, which should avoid collision with each other to produce fracture.3. The bending gap should be adjusted according to the wire diameter of the component leads, and the standard is not to expose the copper. A slight flattening of the component lead is normal.4. After each process, please remove the waste in time.5. When not working for a long time, the parts should be protected with a little oil and wiped off before use.6. Please do not bite the body of the component into the gear, which may break the gear.7. Please add a little 40# motor oil every 3-5 days. Shaping axle, and cutting axle should always keep lubrication. Please add a little 40# motor oil every 3-5 days.8. The distance between each part on both sides should be symmetrical when placed, otherwise, it will affect the exit material.9. Before installation and use, please check the packing list and read the manual carefully.10. Please allow the slight color difference caused by the shooting light and 1-3 cm error due to manual measurement, and make sure you do not mind before ordering.
