
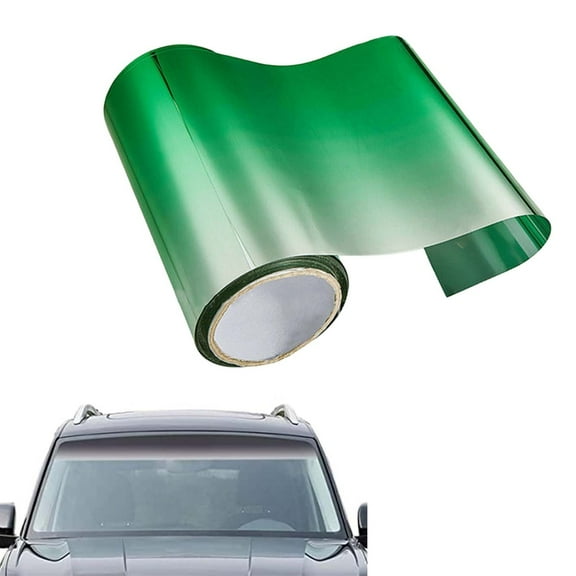
D-GROEE 20x150cm Car Window Sun Visor Strip Film Glossy DIY Car Front Windshield Protect Shade Sticker with Scraper
Key item features
- This is a car front windshield light and heat insulation film, it can improve view during summer driving.
- The windscreen film made of high quality PET, thick and wear-resistant.
- The windscreen film comes with a scraper, easy to install.
Specs
- Automotive window typeFront Windshield
- FeaturesEasy To Install
- BrandD-GROEE
- Color20x150cm
- Items includedWindscreen Film, Scraper
- Accessories includedScraper
How do you want your item?
About this item
Product details
This is a car front windshield light and heat insulation film, it can improve view during summer driving.
The windscreen film made of high quality PET, thick and wear-resistant.
The windscreen film comes with a scraper, easy to install.
Item Name: Windscreen Film
Material: PET
Light Transmittance: 5%
Features: Sun Shade, Heat Insulation, Easy to Install
Size: 20cm x 150cm/7.87" x 59.06" (Approx.)
Notes:
Due to the light and screen setting difference, the item's color may be slightly different from the pictures.
Please allow slight dimension difference due to different manual measurement.
Package Includes:
1 x Windscreen Film
1 x Scraper
- This is a car front windshield light and heat insulation film, it can improve view during summer driving.
- The windscreen film made of high quality PET, thick and wear-resistant.
- The windscreen film comes with a scraper, easy to install.
Specifications
Automotive window type
Features
Brand
Color
Similar items you might like
Based on what customers bought
Best seller Car Front Window Shades,2 Pack Car Side Window Sun Shades,Stretchy Car Mosquito Net Cover Fit Cars SUVs - Up to 31.5”x49.6” $12.99
Best seller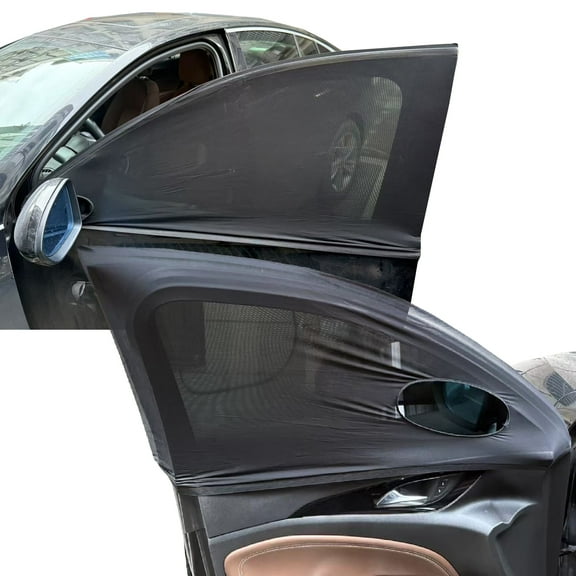 3 optionsAvailable in additional 3 options$1299current price $12.99
Car Front Window Shades,2 Pack Car Side Window Sun Shades,Stretchy Car Mosquito Net Cover Fit Cars SUVs - Up to 31.5”x49.6”
723.8 out of 5 Stars. 72 reviews50+ bought since yesterday Auto Drive Heavy-Duty Silver Accordion Sunshade 1 pack, 63'' x 28.5'' $10.66
50+ bought since yesterday 3 optionsAvailable in additional 3 options$1066current price $10.66
Auto Drive Heavy-Duty Silver Accordion Sunshade 1 pack, 63'' x 28.5''
7034.5 out of 5 Stars. 703 reviewsBest seller Parent's Choice Baby Car Window Cling Shades, UPF 50 , Universal Fit, Blocks Heat & UV, 2 Pack, Black $8.84 $4.42/ea
Best seller $884current price $8.84$4.42/ea
Parent's Choice Baby Car Window Cling Shades, UPF 50 , Universal Fit, Blocks Heat & UV, 2 Pack, Black
844.4 out of 5 Stars. 84 reviewsBest seller 4 Pack Car Window Shades with Magnets,Strong-Light Blocking&UV Protection Car Privacy Shades,Universal Car Interior Accessories for Window,Car Camping and Napping Car Curtains $11.98 $3.00/ea
Best seller 2 optionsAvailable in additional 2 options$1198current price $11.98$3.00/ea
4 Pack Car Window Shades with Magnets,Strong-Light Blocking&UV Protection Car Privacy Shades,Universal Car Interior Accessories for Window,Car Camping and Napping Car Curtains
613.4 out of 5 Stars. 61 reviewsBest seller Wideskall Car Windshield Sunshade Reflective Sun Shade for Car Cover Visor $8.89
Best seller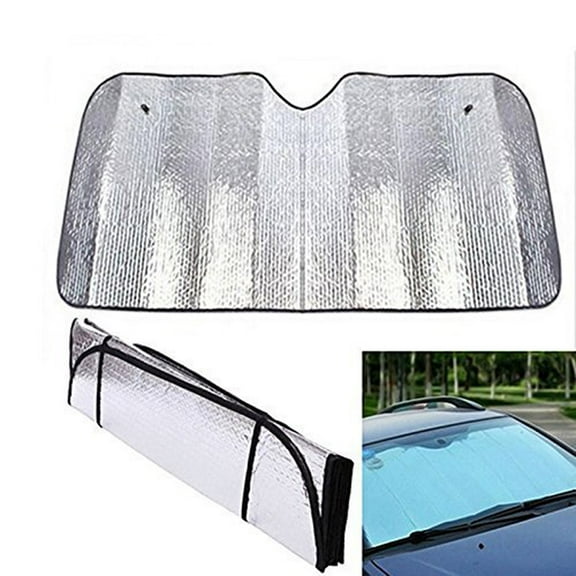 2 optionsAvailable in additional 2 options$889current price $8.89
Wideskall Car Windshield Sunshade Reflective Sun Shade for Car Cover Visor
1723.1 out of 5 Stars. 172 reviewsClearance Car Windshield Sun Strip, Self-Adhesive Front Sun Visor Sticker, Heat and UV Protection, PVC Film, Easy Install and Clean, Stylish Car Window Decoration, Automobile Sunshade for Cars and Vans $4.99 Was $5.94
Clearance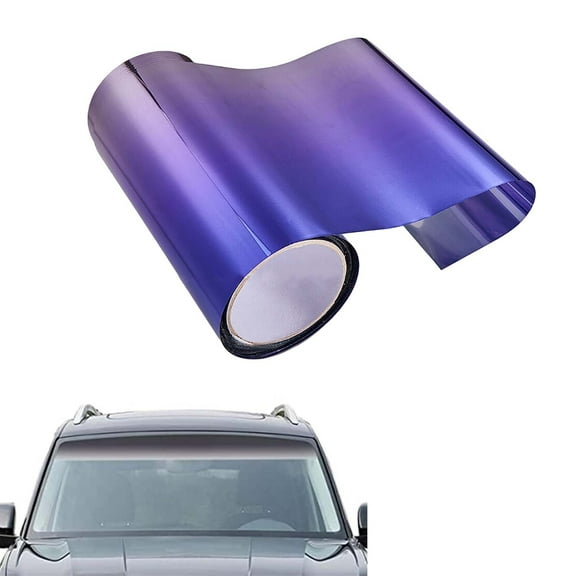


 $499current price $4.99, Was $5.94$5.94
Car Windshield Sun Strip, Self-Adhesive Front Sun Visor Sticker, Heat and UV Protection, PVC Film, Easy Install and Clean, Stylish Car Window Decoration, Automobile Sunshade for Cars and Vans
Best seller Auto Drive 1 Count Blue Retractable Roller Sun Shade , Size 19" x 14" $5.38
Best seller 2 optionsAvailable in additional 2 options$538current price $5.38
Auto Drive 1 Count Blue Retractable Roller Sun Shade , Size 19" x 14"
1373.5 out of 5 Stars. 137 reviewsBest seller VONTER Car Windshield Sunshade Car Sun Protector Foldable Front Window Shade-Thicken 5-Layer Bubble for Auto Windshield Sun Shade UV Protection and Heat Reflector 51"x 23" (Silver) $12.23
Best seller $1223current price $12.23
VONTER Car Windshield Sunshade Car Sun Protector Foldable Front Window Shade-Thicken 5-Layer Bubble for Auto Windshield Sun Shade UV Protection and Heat Reflector 51"x 23" (Silver)
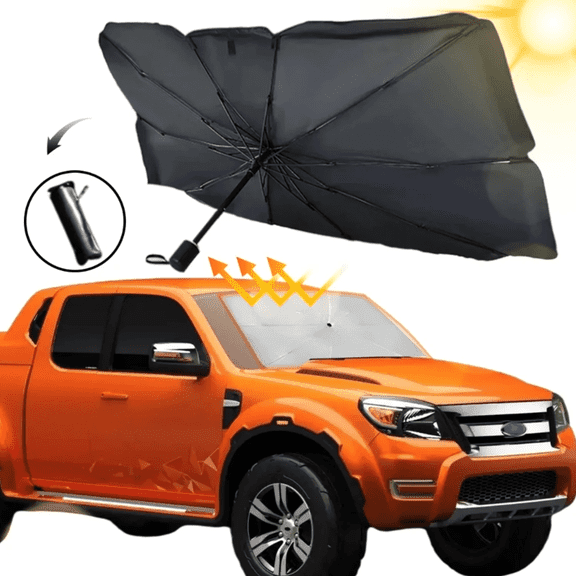
222.7 out of 5 Stars. 22 reviewsBest seller BYXAS 2025 Windshield Sun Shade Umbrella, Foldable Car Umbrella Sunshade with UV Block Car Front Window (Heat Insulation Protection) for Auto Windshield Covers Trucks Cars (47" L x 25" W) $12.99
Best seller 5 optionsAvailable in additional 5 options$1299current price $12.99
BYXAS 2025 Windshield Sun Shade Umbrella, Foldable Car Umbrella Sunshade with UV Block Car Front Window (Heat Insulation Protection) for Auto Windshield Covers Trucks Cars (47" L x 25" W)
234 out of 5 Stars. 23 reviewsClearance HBBKVI Set of 5 Car Window Shades, Car Sun Shade for Most Cars Vehicles, Windshield Sun Shade Side Window Rear Window Heat Protection $4.54 Was $5.18
Clearance $454current price $4.54, Was $5.18$5.18
HBBKVI Set of 5 Car Window Shades, Car Sun Shade for Most Cars Vehicles, Windshield Sun Shade Side Window Rear Window Heat Protection
15 out of 5 Stars. 1 reviewsBest seller Windshield Sun Shade for Car, Car Window Shade, Foldable Car Umbrella Sunshade Cover Car Front Window, Blocks UV Rays Sun Visor Protector Sunshade for Interior Protection, Car Accessories (55"x31") $12.89 Was $26.99
Best seller 2 optionsAvailable in additional 2 options$1289current price $12.89, Was $26.99$26.99
Windshield Sun Shade for Car, Car Window Shade, Foldable Car Umbrella Sunshade Cover Car Front Window, Blocks UV Rays Sun Visor Protector Sunshade for Interior Protection, Car Accessories (55"x31")
1983.8 out of 5 Stars. 198 reviewsBest seller Auto Drive Universal Side Window Suction Cups Grey Curtain Sun Shade 2 Counts , 26" x 19.68" $5.96 $2.98/count
Best seller 2 optionsAvailable in additional 2 options$596current price $5.96$2.98/count
Auto Drive Universal Side Window Suction Cups Grey Curtain Sun Shade 2 Counts , 26" x 19.68"
1283.7 out of 5 Stars. 128 reviewsBest seller Auto Drive Car Umbrella Sun Shade, Universal Fit, Easy to Install, Silver, 55.91"X31.5" $11.28
Best seller 2 optionsAvailable in additional 2 options$1128current price $11.28
Auto Drive Car Umbrella Sun Shade, Universal Fit, Easy to Install, Silver, 55.91"X31.5"
604.6 out of 5 Stars. 60 reviewsBest seller Rirool Window Sunshade for Car Side Windows, 20" x 12", Blocks 97% UV Rays, Foldable Static Cling Sun Shades for Baby and Kids, Fits Most SUVs, Sedans, Minivans, 4 Pack $10.00 Was $16.99
Best seller $1000current price $10.00, Was $16.99$16.99
Rirool Window Sunshade for Car Side Windows, 20" x 12", Blocks 97% UV Rays, Foldable Static Cling Sun Shades for Baby and Kids, Fits Most SUVs, Sedans, Minivans, 4 Pack
854.3 out of 5 Stars. 85 reviewsCar Windshield Sunshade Reflective Sun Shade for Car Cover Visor $7.09
2 optionsAvailable in additional 2 options$709current price $7.09Car Windshield Sunshade Reflective Sun Shade for Car Cover Visor
182.4 out of 5 Stars. 18 reviewsCar Sun Strip Windshield Sunshade Film | Front Windscreen PVC Window Sticker | Self-Adhesive, Waterproof, UV Protection, Scratch Resistant | 20x150cm for Automobiles $4.96


 $496current price $4.96
Car Sun Strip Windshield Sunshade Film | Front Windscreen PVC Window Sticker | Self-Adhesive, Waterproof, UV Protection, Scratch Resistant | 20x150cm for Automobiles
15 out of 5 Stars. 1 reviewsHome Times Windshield Sun Shade,Summer Foldable Umbrella Car Sun Shade Cover for Car Front Window (Heat Insulation Protection),Trucks/Cars/Auto Windshield Covers (57*31'',Large,Silver) $14.99
 2 optionsAvailable in additional 2 options$1499current price $14.99
Home Times Windshield Sun Shade,Summer Foldable Umbrella Car Sun Shade Cover for Car Front Window (Heat Insulation Protection),Trucks/Cars/Auto Windshield Covers (57*31'',Large,Silver)
1094 out of 5 Stars. 109 reviewsUHUSE Car 5%VL Sun Visor Strip Tint Film Front Glass Windshield Anti-UV Shade Decal $8.88
 $888current price $8.88
UHUSE Car 5%VL Sun Visor Strip Tint Film Front Glass Windshield Anti-UV Shade Decal
11 out of 5 Stars. 1 reviewsAyamaya Car Front Windshield Sun Shade,Foldable Anti-UV Cartoon Car Front Window Sunshade Fits Most Model of Cars 1 Pcs 59''33'' $8.99
 7 optionsAvailable in additional 7 options$899current price $8.99
Ayamaya Car Front Windshield Sun Shade,Foldable Anti-UV Cartoon Car Front Window Sunshade Fits Most Model of Cars 1 Pcs 59''33''
2244.4 out of 5 Stars. 224 reviewsOefntac Sun Strip Car Sun Strip Front Windshield Sunshade Tint Self-Adhesive Sun Visor Film UV Protection Auto Window Installation Universal Fit $5.99
 $599current price $5.99
Oefntac Sun Strip Car Sun Strip Front Windshield Sunshade Tint Self-Adhesive Sun Visor Film UV Protection Auto Window Installation Universal Fit
Customer ratings & reviews
Customer photos
Showing 1-1 of 1 review
Verified Purchase
Excellent quality and great price.
End result is a great sunshade! It adhered strongly and looks great. It was a 2 person job. After cleaning the outside of the windshield, I gently peeled about 3 inches of the membrane back exposing the very sticky adhesive side of the sun visor strip. I had the 2nd person unroll it and hold it tightly (I stood on one side of my van and she stood on the other side). As she gently pulled the strip toward her, I carefully lined up and placed about one inch of the sticky side onto the windshield. I placed the plastic tool (enclosed with the strip) against the film and drew it toward my wife about 1 inch at a time. I pressed it firmly against the windshield to make sure and eliminate bubbles. If there was a crease we would lift that part off and place it back down. As I worked across the windshield, some of the film went above the windshield onto the van roof but I kept going and took a razor blade and carefully removed that portion after I finished (the curved windshield caused that overlap). Again, the process went slow, firmly working bubbles out. After I finished, I carefully removed excess film with a new razor blade (BEING CAREFUL ONLY TO CUT FILM ON THE SURFACE OF THE WINDSHIELD BUT NOT WINDOW WEATHER STRIPPING OR PAINTED SURFACE). After I removed the excess film I then looked for (and found) more bubbles. I firmly worked them out as well. We both really like the finished job but it took a full hour to finish.
