
Sojag Monaco Champagne 12 ft. x 14 ft. Gazebo
Key item features
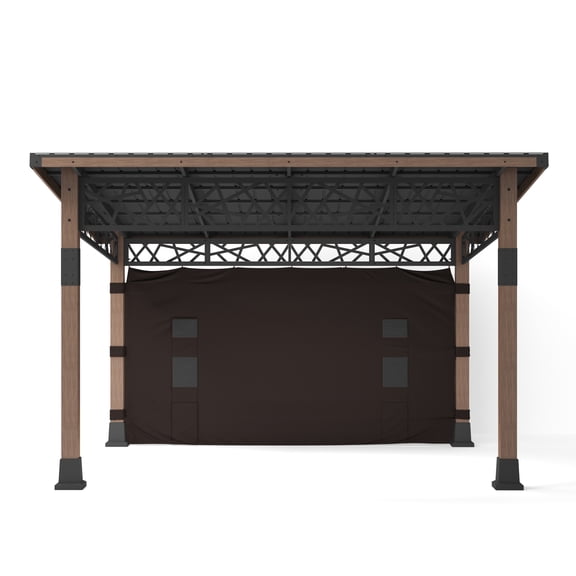
- Robust Construction: Features an extruded aluminum frame with Akzonobel's Interpon powder coating for maximum scratch and corrosion resistance, ensuring enhanced durability.
- Weatherproof Roof: Equipped with galvanized steel panels that provide superior protection from the elements, designed for long-lasting outdoor use.
- Enhanced Stability: A wide diameter structure offers additional durability and protection, complemented by stainless steel bolts and screws for maximum stability and rust prevention.
- Optimal Airflow: Incorporates a double roof design that improves air circulation, contributing to comfort and aesthetic appeal.
- Pest Protection: Includes PVC-coated polyester netting to prevent mosquitos and other insects from entering, resisting fading and deterioration.
- Effortless Assembly: Comes with illustrated instructions featuring detailed pictures for step-by-step guidance, simplifying the setup process.
Specs
- FeaturesRust Resistant
- Coverage area165.41 sq ft
- Roof materialGalvanized Steel
- Gazebo roof typeHard-Top
- Gazebo typePavilions
- ShapeRectangle
How do you want your item?
About this item
Product details
- Protective Coating: Akzonobel'S Interpon Powder Coating Provides Maximum Scratch And Corrosion Resistance
- Reinforced Construction: Frame Features An Extruded Aluminum Design That Produces Enhanced Durability
- Durable Roof: The Galvanized Steel Panels Provide Maximum Protection From The Elements
- Additional Stability: This Premium Model Features A Wide Diameter Structure That Provides Additional Durability And Protection From The Elements
- Improved Air Circulation: A Double Roof Design Provides Appealing Aesthetic While Simultaneously Increasing Airflow For Comfort And Style
- Rustproof: The Aluminum Frame Is Rustproof, Making It Durable And Maintenance-Free
- Illustrated Instructions: Assembly Made Easy With Detailed Pictures Illustrating Step-By-Step Instructions
- Pest Management: Pvc-Coated Polyester Netting Prevents Mosquitos And Other Insects From Entering The Gazebo This High-Quality Material Resists Fading And Deterioration
- Durable Hardware: Stainless Steel Bolts And Screws Ensure Maximum Stability While Preventing Rust And Corrosion
Specifications
Features
Coverage area
Roof material
Frame material
Warranty
Warranty information
Please be aware that the warranty terms on items offered for sale by third party Marketplace sellers may differ from those displayed in this section (if any). To confirm warranty terms on an item offered for sale by a third party Marketplace seller, please use the 'Contact seller' feature on the third party Marketplace seller's information page and request the item's warranty terms prior to purchase.
Similar items you might like
Based on what customers bought
Hommow 10' X 12' Hardtop Gazebo Aluminum Frame Gazebo with Galvanized Steel Double Roof $499.99
 Sponsored$49999current price $499.99+$99.99 shipping
Hommow 10' X 12' Hardtop Gazebo Aluminum Frame Gazebo with Galvanized Steel Double Roof
264.3 out of 5 Stars. 26 reviewsShipping, arrives in 3+ daysBest seller Ainfox 11x11 ft Outdoor Patio Pop Up Canopy Gazebo with Heavy Duty Frame, Mosquito Netting & UV Protection,White $106.99 Was $189.99
Best seller SponsoredNow$10699current price Now $106.99, Was $189.99$189.99You save $83.00You save$83.00
Ainfox 11x11 ft Outdoor Patio Pop Up Canopy Gazebo with Heavy Duty Frame, Mosquito Netting & UV Protection,White
3334.2 out of 5 Stars. 333 reviewsSave with Shipping, arrives tomorrow
Sojag Marsala 10 ft. x 14 ft. Gazebo $1,548.76
 $1,54876current price $1,548.76
Sojag Marsala 10 ft. x 14 ft. Gazebo
In 50+ people's carts Aoxun 10 ft. x 12 ft. Hardtop Gazebo, Double Polycarbonate Roof Aluminum Frame Gazebo W/Curtain and Netting, Brown $389.99 Was $734.98
In 50+ people's carts 10 optionsAvailable in additional 10 options$38999current price $389.99, Was $734.98$734.98
Aoxun 10 ft. x 12 ft. Hardtop Gazebo, Double Polycarbonate Roof Aluminum Frame Gazebo W/Curtain and Netting, Brown
3823.8 out of 5 Stars. 382 reviewsSojag Mykonos 12 ft. x 12 ft. Gazebo $1,999.99
 4 optionsAvailable in additional 4 options$1,99999current price $1,999.99
Sojag Mykonos 12 ft. x 12 ft. Gazebo
1584.1 out of 5 Stars. 158 reviewsSunjoy Archwood 13 ft. x 15 ft. Cedar Framed Hard Top Gazebo with Black Steel 2-tier Hip Roof $1,420.30 Was $1,521.75
 $1,42030current price $1,420.30, Was $1,521.75$1,521.75
Sunjoy Archwood 13 ft. x 15 ft. Cedar Framed Hard Top Gazebo with Black Steel 2-tier Hip Roof
2714.9 out of 5 Stars. 271 reviewsYescom 8x8Ft 2-Tier Gazebo Top Replacement UV30 for 2 Tier Outdoor Patio Canopy Cover Party Backyard Garden Red $44.90
 9 optionsAvailable in additional 9 options$4490current price $44.90
Yescom 8x8Ft 2-Tier Gazebo Top Replacement UV30 for 2 Tier Outdoor Patio Canopy Cover Party Backyard Garden Red
1394.4 out of 5 Stars. 139 reviewsReduced price Sunjoy 12 ft. x 16 ft. Cedar Framed Gazebo with Dark Brown Steel Hardtop $1,976.25 Was $2,371.50
Reduced price $1,97625current price $1,976.25, Was $2,371.50$2,371.50
Sunjoy 12 ft. x 16 ft. Cedar Framed Gazebo with Dark Brown Steel Hardtop
2874.9 out of 5 Stars. 287 reviewsBest seller Ainfox 11x11 ft Outdoor Patio Pop Up Canopy Gazebo with Heavy Duty Frame, Mosquito Netting & UV Protection,Navy Blue $139.99 Was $259.99
Best seller 3 optionsAvailable in additional 3 options$13999current price $139.99, Was $259.99$259.99
Ainfox 11x11 ft Outdoor Patio Pop Up Canopy Gazebo with Heavy Duty Frame, Mosquito Netting & UV Protection,Navy Blue
4604.4 out of 5 Stars. 460 reviewsPURPLE LEAF 10' X 14' Permanent Hardtop Gazebo Aluminum Gazebo with Galvanized Steel Double Roof for Patio Lawn and Garden, Curtains and Netting Included, Gray $1,399.99
 41 optionsAvailable in additional 41 options$1,39999current price $1,399.99
PURPLE LEAF 10' X 14' Permanent Hardtop Gazebo Aluminum Gazebo with Galvanized Steel Double Roof for Patio Lawn and Garden, Curtains and Netting Included, Gray
1704.7 out of 5 Stars. 170 reviewsSojag Striano 12 ft. x 14 ft. Gazebo Screen House $3,599.99
 2 optionsAvailable in additional 2 options$3,59999current price $3,599.99
Sojag Striano 12 ft. x 14 ft. Gazebo Screen House
PURPLE LEAF 12 x 20 ft. Wood Gazebo,Upgrade Outdoor Hardtop Gazebo with Galvanized Steel Double Roof for Patio with Netting $2,109.98 Was $2,109.98
 14 optionsAvailable in additional 14 options$2,10998current price $2,109.98, Was $2,109.98$2,109.98
PURPLE LEAF 12 x 20 ft. Wood Gazebo,Upgrade Outdoor Hardtop Gazebo with Galvanized Steel Double Roof for Patio with Netting
574.6 out of 5 Stars. 57 reviewsKozyard Apollo 10’x12’ Hardtop Gazebo, Wooden Coated Aluminum Frame with Galvanized Steel Double Roof, Outdoor Permanent Metal Pavilion with Netting for Patio, Deck and Lawn (10ft x 12ft) $1,149.99
 6 optionsAvailable in additional 6 options$1,14999current price $1,149.99
Kozyard Apollo 10’x12’ Hardtop Gazebo, Wooden Coated Aluminum Frame with Galvanized Steel Double Roof, Outdoor Permanent Metal Pavilion with Netting for Patio, Deck and Lawn (10ft x 12ft)
974.8 out of 5 Stars. 97 reviewsReduced price HOTEEL 12' x 12' Pop-Up Gazebo Outdoor Gazebo Portable Canopy with Mosquito Netting Patio Tent Backyard Canopy with 3 Adjustable Heights, Gray $102.89 Was $199.99
Reduced price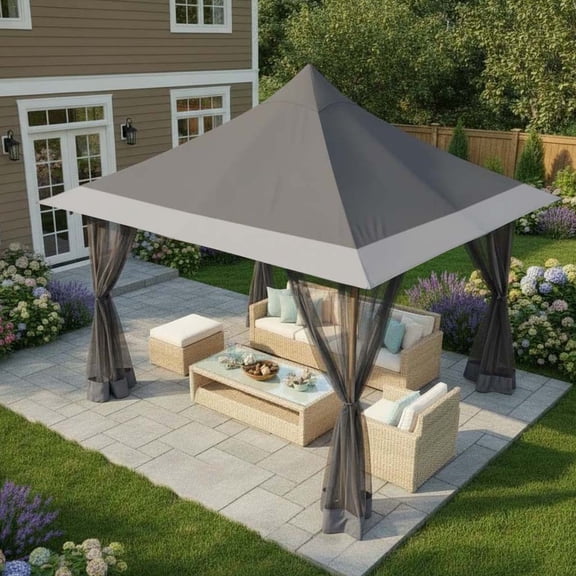 5 optionsAvailable in additional 5 options$10289current price $102.89, Was $199.99$199.99
HOTEEL 12' x 12' Pop-Up Gazebo Outdoor Gazebo Portable Canopy with Mosquito Netting Patio Tent Backyard Canopy with 3 Adjustable Heights, Gray
804.1 out of 5 Stars. 80 reviewsMeetLeisure 13' x 15' Cedar Solid Wood Patio Hardtop Gazebo with Black Steel Gable Roof for Patios Lawn Backyard, Black $1,299.99
 2 optionsAvailable in additional 2 options$1,29999current price $1,299.99
MeetLeisure 13' x 15' Cedar Solid Wood Patio Hardtop Gazebo with Black Steel Gable Roof for Patios Lawn Backyard, Black
Sojag Genova Ii 12 Ft. X 16 Ft. Gazebo $1,919.99
 $1,91999current price $1,919.99
Sojag Genova Ii 12 Ft. X 16 Ft. Gazebo
254 out of 5 Stars. 25 reviewsSojag Savino 10 Ft. X 12 Ft. Gazebo $1,399.99
 2 optionsAvailable in additional 2 options$1,39999current price $1,399.99
Sojag Savino 10 Ft. X 12 Ft. Gazebo
12FT.X 14FT.Outdoor Wooden Gazebo With Sloping Roof $1,559.99
 $1,55999current price $1,559.99
12FT.X 14FT.Outdoor Wooden Gazebo With Sloping Roof
Sojag Savannah 10 x 10 x 9 ft Black Aluminum Frame Gazebo, Galvanized Steel Roof for Maximum Protection, Contemporary Design $833.43
 2 optionsAvailable in additional 2 options$83343current price $833.43
Sojag Savannah 10 x 10 x 9 ft Black Aluminum Frame Gazebo, Galvanized Steel Roof for Maximum Protection, Contemporary Design
214.4 out of 5 Stars. 21 reviewsBest seller HOTEEL 12' x 12' Outdoor Pop-Up Gazebo Canopy with Mosquito Netting, 2-Tiered Vented Top, 3 Adjustable Heights for Backyard, Garden, Lawn, Light Grey $106.99 Was $189.99
Best seller 13 optionsAvailable in additional 13 options$10699current price $106.99, Was $189.99$189.99
HOTEEL 12' x 12' Outdoor Pop-Up Gazebo Canopy with Mosquito Netting, 2-Tiered Vented Top, 3 Adjustable Heights for Backyard, Garden, Lawn, Light Grey
5824.2 out of 5 Stars. 582 reviews
Check out these related products
Sojag Outdoor 10' x 12' Fontana Hardtop Double Roof Gazebo Outdoor Sun Shelter, Wood and Black $2,309.99
 $2,30999current price $2,309.99
Sojag Outdoor 10' x 12' Fontana Hardtop Double Roof Gazebo Outdoor Sun Shelter, Wood and Black
204.9 out of 5 Stars. 20 reviewsSojag Skylight 10 Ft. X 12 Ft. Gazebo, Outdoor Sun Shelter $1,699.99
 $1,69999current price $1,699.99
Sojag Skylight 10 Ft. X 12 Ft. Gazebo, Outdoor Sun Shelter
Sojag Outdoor 10' X 10' Sanibel Hardtop Gazebo Outdoor Sun Shelter, Wood Finish $1,099.99
 2 optionsAvailable in additional 2 options$1,09999current price $1,099.99
Sojag Outdoor 10' X 10' Sanibel Hardtop Gazebo Outdoor Sun Shelter, Wood Finish
224.8 out of 5 Stars. 22 reviewsSojag Meridien 12 Ft. X 16 Ft. Gazebo $999.99
 $99999current price $999.99
Sojag Meridien 12 Ft. X 16 Ft. Gazebo
73 out of 5 Stars. 7 reviewsSojag Verona 10 ft. x 14 ft. Hardtop Gazebo, Weather-Resistant $963.29
 3 optionsAvailable in additional 3 options$96329current price $963.29
Sojag Verona 10 ft. x 14 ft. Hardtop Gazebo, Weather-Resistant
43.5 out of 5 Stars. 4 reviewsSojag Nanda 12' x 12' Hardtop Gazebo, Outdoor Weather-Resistant Aluminum Frame Shelter with Mosquito Net $2,999.99
 $2,99999current price $2,999.99
Sojag Nanda 12' x 12' Hardtop Gazebo, Outdoor Weather-Resistant Aluminum Frame Shelter with Mosquito Net
15 out of 5 Stars. 1 reviewsSojag Turia 12 x 10 x 9 ft Grey Gazebo $893.27 Was $999.99
 $89327current price $893.27, Was $999.99$999.99
Sojag Turia 12 x 10 x 9 ft Grey Gazebo
15 out of 5 Stars. 1 reviewsSojag Diani 12 x 10 x 9 ft Black Gazebo $789.60 Was $949.99
 $78960current price $789.60, Was $949.99$949.99
Sojag Diani 12 x 10 x 9 ft Black Gazebo
Sojag Boda 12 x 12 x 10 ft Wood Effect Gazebo $1,526.85
 $1,52685current price $1,526.85
Sojag Boda 12 x 12 x 10 ft Wood Effect Gazebo
Sojag Monteserra 10 x 12 x 9 ft Black Gazebo $1,087.81 Was $1,199.99
 $1,08781current price $1,087.81, Was $1,199.99$1,199.99
Sojag Monteserra 10 x 12 x 9 ft Black Gazebo
Sojag Nanda 12 x 12 x 10 ft Grey Gazebo $1,462.97
 $1,46297current price $1,462.97
Sojag Nanda 12 x 12 x 10 ft Grey Gazebo
Sojag Dakota 6 x 8 x 8 ft Black BBQ Gazebo $839.99
 $83999current price $839.99
Sojag Dakota 6 x 8 x 8 ft Black BBQ Gazebo
Sojag Danxia 9 x 7 x 9 ft Teal Gazebo $799.99
 $79999current price $799.99
Sojag Danxia 9 x 7 x 9 ft Teal Gazebo
Sojag Dunwich 8 ft. x 8 ft. Gazebo $523.79
 $52379current price $523.79
Sojag Dunwich 8 ft. x 8 ft. Gazebo
Sojag Ventura 10 x 14 x 9 ft Dark Grey Gazebo $1,399.99
 $1,39999current price $1,399.99
Sojag Ventura 10 x 14 x 9 ft Dark Grey Gazebo
64.3 out of 5 Stars. 6 reviewsAoodor 12 x 10 ft. Outdoor Solid Wooden Frame Gazebo with 2-Tier Hardtop Roof, for Patio Backyard Deck and Lawns - Black Canopy $1,099.99
 $1,09999current price $1,099.99
Aoodor 12 x 10 ft. Outdoor Solid Wooden Frame Gazebo with 2-Tier Hardtop Roof, for Patio Backyard Deck and Lawns - Black Canopy
34.3 out of 5 Stars. 3 reviews
Customer ratings & reviews
Customer photos


 +1 image
Showing 1-3 of 12 reviews
Best Gazebo ever
I had been using a pop up tent on our patio for several years and I have been eyeing a gazebo as a replacement. My neighbor purchased the Sojag MyKonos 2 gazebo and I helped him put it up. Not only was it easy to assemble but it looks terrific too. I was hooked and bought mine this year. I didn't have as large a patio and I liked the champagne color so I picked the Monaco. I found this too was easy to assemble (in 2 days) and very sturdy. I would highly recommend it to anyone and look forward to enjoying it with my family and friends for many years to come. Thank you ShelterLogic your a great company to deal with.
Verified Purchase
Perfectly perfect
It is amazing well built took one person two days. Couldn't be happier
Thank you for the 5 star rating.
High quality - well thought out Gazebo
[This review was collected as part of a promotion.] This is a review of the Sojag Monaco Champagne 10 ft. x 10 ft. Gazebo. I have had those cheap gazebos with tarp/cloth coverings and having to replace the cloth every year due to elements was making them more expensive than just getting a higher end gazebo like the Sojag. The gazebo came in 2 boxes – one with all the roof tiles and the other box contained all the other pieces. The roof box was 92lbs and then the other box was around 180lbs. However, no single piece is heavy – there's just a lot that makes up the finished product. When finished you will have put together over 190 pieces using over 300 bolts/screws. This is really a high quality and thought-out gazebo. I put this together with my son and it took just under 10 hours, but I'm old and senile and don't move as quick as I used to. Although I love everything about this gazebo – here are a few highlights: • 4 mosquito nets that wrap around the entire structure. They slide so smooth and can be secured open or closed. There is also a small square mosquito net that can be velcro'd at the top roof tier to stop mosquitos from coming in from up top. • 2 tier roof adds a nice high-end quality look and allows for release or air when there are high winds. • Gutters – I was concerned with where I was going to place this as I wanted to put it close to the back door so you could walk out the back door and immediately be under the Gazebo if it was raining. Then it hit me that if it rains the water would be coming off the angled roof eve straight at the back door. However, when putting it up I saw how the water would roll down the roof tiles into the outer edges which are like gutters. The water than flows through those and out the legs. • They spent the effort in making sure this gazebo is squared up. There are just so many cross joints at each level to be sure when you're finished that it's truly secured and squared up. My older gazebo may have had a cross beam, but this gazebo would have a cross beam and then a left arm, right arm, top right, top left, etc. • When finished it's just under 300lbs. All individual pieces were actually really light weight, but when all put together it'll be heavy. We have 30+ mile per hour winds today and it's not moving. I included several assembly photos and have a few tips below: • All the bolts and screws and even the mosquitos net clips have extra pieces – so don't worry if you lose one. There are extras. • If you're under 6 foot and/or have short arms - I would make sure I had at least (2) 8 foot ladders. It can be done with one, but some of the higher items may be more difficult. If you're under 6' a step ladder also comes in handy and can easily be moved around. • Power drill won't help much initially. None of the bolts/screws really tighten that much. Not like you're tightening anything an inch where it would save time. For example, the roof bolts tighten maybe a ¼ inch at most. • When doing the roof beams, cross beams, etc. – just loosely tighten. The holes have some give around the bolts. If you tighten them completely then when putting on the roof shingles the holes may not align real good and you'll spend 15 minutes trying to get one bolt in when you could have done it in 15 seconds. We tightened everything real tights and then about half-way though went back and loosened up these beams and holes aligned much easier. Just be sure to tighten the bolts you won't be able to reach later as it's being assembled. After all roof pieces were done, I then finally made use of the drill. I set it to a 3 for tightness and then had about a quarter inch final turn with the hex wrench. I'm pretty sure we wasted at least 90 minutes messing with trying to get bolts in where if we just would have not tightened so much, we would have been fine. • For the roof panels get one bolt in place (loosely tightened) and then align the remaining holes. Since panels overlap – put the next panel up and one bolt in place (lightly tightened). With only one bolt in place, it will allow for the roof panel to move – at this point align the holes from the first panel and the overlap panel and get your bolts put in the first panel. There is an optional Winter Support Post I may look into purchasing since we just had a 5-day ice storm. I can see how that would benefit anyone who has bad winter conditions. Overall, I am really happy with the finished product and would highly recommend the Sojag brand. It's a very high-quality product and as mentioned they really put some thought into the final product and design.
